
Showing posts with label Woodworking hobbist. Show all posts
Showing posts with label Woodworking hobbist. Show all posts
Tuesday, December 14, 2010


Saturday, August 21, 2010
Children Study Desk & Chair Set
Carving, Engraving & Profile Cutting is fun & the product are pleasant to the eye. BUT mostly useless... Very much like having sex...
This doesn't satisfy my natural crave to build something useful...
I've seen many furniture we made with CNC router... but can this really be done without any further human inteference?
It is unevitable that I set out to build a set of functional furniture... eventually... & that "eventually" came sooner then I could anticipated...
 The choice of the month is a Children Desk & Chair set. Why Children furniture you may ask... They are no less difficult then any other furniture & they are smaller (that means less material to buy...) period...
Took some serious effort into research of suitable joineries... After over 2 weeks of toying with various design combination in my head... I conjure enough energy to keep myself nailed infront of the computer monitor for 2 full days to come up with the 1st version...
After a not-so-satisfied prototype & some alteration on the original version. This is my final results. A chair that is ergonimically correct, light-weight & assembled (easily) without glue straight out of the machine. AND (most importantly) they look right to my eye too...
"Flat-packe" profile cut


Now... How should I paint this thing...
This doesn't satisfy my natural crave to build something useful...
I've seen many furniture we made with CNC router... but can this really be done without any further human inteference?
It is unevitable that I set out to build a set of functional furniture... eventually... & that "eventually" came sooner then I could anticipated...
 The choice of the month is a Children Desk & Chair set. Why Children furniture you may ask... They are no less difficult then any other furniture & they are smaller (that means less material to buy...) period...
Took some serious effort into research of suitable joineries... After over 2 weeks of toying with various design combination in my head... I conjure enough energy to keep myself nailed infront of the computer monitor for 2 full days to come up with the 1st version...
After a not-so-satisfied prototype & some alteration on the original version. This is my final results. A chair that is ergonimically correct, light-weight & assembled (easily) without glue straight out of the machine. AND (most importantly) they look right to my eye too...
"Flat-packe" profile cut


Now... How should I paint this thing...
Thursday, August 12, 2010
Another Health Hazard Management - Dust Collector
Anyone whom ever worked with wood working power tools can tell you how fast & convinient they make, BUT no one ever mentioned the mess it left with the amount of wood dust, saw dust they generate...
Wood dust get into everywhere! That includes every possible crackes, gap, opening in the building... Those which manage to get air bourn will stay air bourne for hours!!!
Not forgetting the demage they can do to our lungs, nostril & any other opening in your body...
I'm a lazy sob, I hate to do cleaning chore... & I don't want to die of lung cancer...
Naturally, I'm reluctant to use my CNC Router....Cleaning the mess is hell!!!
To keep my sanity & healthy lungs, I installed a full fledge 2-Stage Dust Collecting System... which really is nothing more then a glorified industrial grade vacuum cleaner...
 I bought this Twin-Bag Single-Stage Dust Collector, I did planned to build this from scratch but again... As I'm a lazy sob especially when the financial benifit did not churn out more the 70% savin...
The white thingy is the fabric filter bag which stop fine dust from entering the shop ambient.

This is the centrifugal fan which acts as the "sucker"
Since the fan impellar & filter bag do worth some money, it will be best to have a buffer to remove most of the saw dust & foreign object from getting to them. The ideal solution (for me) will be a dust cyclone, which is not difficult & expensive to construct but I came accrose this Thien Separator in the internet which is even easier & cheaper to construct.
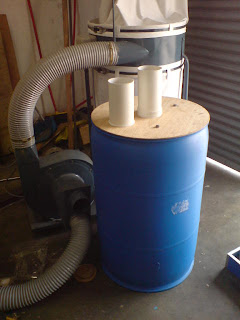 This is the Thien Separator which were constructed from a 200L barrael which I robbed from a friend & some fitting & CNC cut plywood. This will drop off 80~90% of the saw dust & any heavy foreign object from contact with the fan impeller and fill up the filter bag.
 This how they look inside.

Another view of the separator internal organs
it will confirn the saw dust within the effective vacuum suction region. Also capture larger wood chips from flying all over the place. the brush is a door seal brush & the rest of the wooden structure were cut by my CNC router. Everything just snapped on seamlessly.
The original hole around the cutting bit is round but was accidently demaged during test... but it still work beautifully as it is now... (too lazy to make another...)
Now.... I am fresh out of excuse to delay cleaning up the workshop....
Wood dust get into everywhere! That includes every possible crackes, gap, opening in the building... Those which manage to get air bourn will stay air bourne for hours!!!
Not forgetting the demage they can do to our lungs, nostril & any other opening in your body...
I'm a lazy sob, I hate to do cleaning chore... & I don't want to die of lung cancer...
Naturally, I'm reluctant to use my CNC Router....Cleaning the mess is hell!!!
To keep my sanity & healthy lungs, I installed a full fledge 2-Stage Dust Collecting System... which really is nothing more then a glorified industrial grade vacuum cleaner...

The white thingy is the fabric filter bag which stop fine dust from entering the shop ambient.

This is the centrifugal fan which acts as the "sucker"
Since the fan impellar & filter bag do worth some money, it will be best to have a buffer to remove most of the saw dust & foreign object from getting to them. The ideal solution (for me) will be a dust cyclone, which is not difficult & expensive to construct but I came accrose this Thien Separator in the internet which is even easier & cheaper to construct.


Another view of the separator internal organs
it will confirn the saw dust within the effective vacuum suction region. Also capture larger wood chips from flying all over the place. the brush is a door seal brush & the rest of the wooden structure were cut by my CNC router. Everything just snapped on seamlessly.

The original hole around the cutting bit is round but was accidently demaged during test... but it still work beautifully as it is now... (too lazy to make another...)
 suction hose attachement.
 Then the flexible host.
Now.... I am fresh out of excuse to delay cleaning up the workshop....
Sunday, July 18, 2010
Upgrade Cooling water System for Water Cool Spindle
My spindle cooling water pump gave up on me!
No, I didn't fry my spindle along with it :)
I was so glad I had the reservoir made out of transparent plastic container! Saw that the water flow was reduced to a trickle when I started up the pump 2 weeks ago...
After some leg work, found a nice submersible pump. It was a love at 1st sight! black aluminium body, stainless steel impeller & shaft, 415V/3 phase, 1/10 horse power (75 watt) , capable of 2m head but didn't indicate the flow rate... & the best part was its has a RM250 price-tag! well within my RM300 budget! I love it so much that I couldn't care less about the flow rate...
I only need 350 ml/min which I recon a lovely pump of this specs will surely achieve.
Another pleasant surprise to find the shop next door carry some heavy-duty PE tanks! So I just got hold of a 16 liter tank, I choose it as it look about right size to keep the pump stable...
More leg work to find some extra 6mm tubing, connector, reducer, 4 core wires, an on-off switch, some screws, washers, pp tubing tape...
 Took a nice Sunday morning in cooling rain to tie everything up nicely...
Open up all the necessary opening for mounting the pump, fit the reducer at the outlet,use up some 20m of 6mm pneumatic tubing to go along the cable chain, I like the pneumatic tubing as it has stiff tube wall, it is light weight & the glossy finishing eye-catching... & some fittings to go along...
Tie up the electic cable, switch, got the motor direction correct & ready for a test.
The pump fills up a 1 liter paint can in 2 minutes 45 seconds, so a healthy 363 ml/min. consider the amount of work it has to get through some 30m long tiny 6mm tubing... an improvement over my old aquarium which was 300 ml/min at its best...
Ran the motor with the spindle running for over an hour & everything is cool & nice! This industrial grade outfit will serve me trouble-free for a long time...
Total damage? RM276... yeah... don't believe everything written on the price tag.... LOL
I would conclude this upgrade a complete success!
What next?
I can' really see the water level despite the translucent tank wall, will buy some of car radiator coolant to give a distinct color to it & give better corrosion protection to my pricy spindle. If it still doesn't work, I'll die the coolant with ink :)
No, I didn't fry my spindle along with it :)
I was so glad I had the reservoir made out of transparent plastic container! Saw that the water flow was reduced to a trickle when I started up the pump 2 weeks ago...
After some leg work, found a nice submersible pump. It was a love at 1st sight! black aluminium body, stainless steel impeller & shaft, 415V/3 phase, 1/10 horse power (75 watt) , capable of 2m head but didn't indicate the flow rate... & the best part was its has a RM250 price-tag! well within my RM300 budget! I love it so much that I couldn't care less about the flow rate...
I only need 350 ml/min which I recon a lovely pump of this specs will surely achieve.
Another pleasant surprise to find the shop next door carry some heavy-duty PE tanks! So I just got hold of a 16 liter tank, I choose it as it look about right size to keep the pump stable...
More leg work to find some extra 6mm tubing, connector, reducer, 4 core wires, an on-off switch, some screws, washers, pp tubing tape...
 Took a nice Sunday morning in cooling rain to tie everything up nicely...
Open up all the necessary opening for mounting the pump, fit the reducer at the outlet,use up some 20m of 6mm pneumatic tubing to go along the cable chain, I like the pneumatic tubing as it has stiff tube wall, it is light weight & the glossy finishing eye-catching... & some fittings to go along...
Tie up the electic cable, switch, got the motor direction correct & ready for a test.
The pump fills up a 1 liter paint can in 2 minutes 45 seconds, so a healthy 363 ml/min. consider the amount of work it has to get through some 30m long tiny 6mm tubing... an improvement over my old aquarium which was 300 ml/min at its best...
Ran the motor with the spindle running for over an hour & everything is cool & nice! This industrial grade outfit will serve me trouble-free for a long time...
Total damage? RM276... yeah... don't believe everything written on the price tag.... LOL
I would conclude this upgrade a complete success!
What next?
I can' really see the water level despite the translucent tank wall, will buy some of car radiator coolant to give a distinct color to it & give better corrosion protection to my pricy spindle. If it still doesn't work, I'll die the coolant with ink :)
Saturday, April 3, 2010
ITS ALIVE!!!!!!
Virgin cut were commenced on 5:30pm 31st March 2010....
There outcome.......... Speechless....
I'll just let the pix talk...


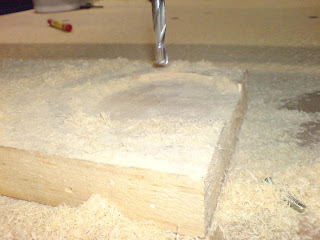
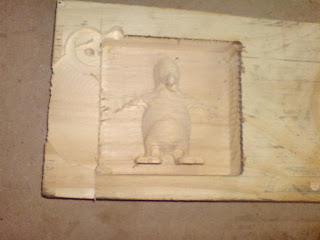
The 1st complete relief carving....
Will frame this as it is for me to show my grand children...
Now that I'd build the "car" I'll have to learn to drive.
There outcome.......... Speechless....
I'll just let the pix talk...


The 1st complete relief carving....
Will frame this as it is for me to show my grand children...
Now that I'd build the "car" I'll have to learn to drive.
Saturday, December 19, 2009
Workbench
 Got tired of using makeshift table & boxes...
Now that I have an empty shop to tinker, I must build a custom workbench.
Free plan of the bench is available upon request.


.
Subscribe to:
Posts (Atom)