~"Cabinet"~
Enclosure use to barricade dangerous/fragile thingy from the public brutality.
It can be a plain container of any shape & material or
with lots of cosmatic & decor for aesthetic reason.
It may be water tight. air tight or fire proof depends on requirements.
Your imagination (or your budget...) is the limit...
~ "Chassis" ~
A structural platform from which we build stuff on. Be it a electrical & electronics appliance or a car. Others prefer to call it skeleton.
material is function & budget dependent...
Public Appearance
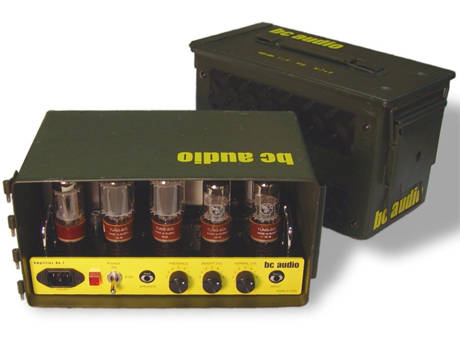
Lets examine the "genaric" form the modern Hifi tube-amp use.

Exposed Tubes with a couple of hundrad volt waiting for a good kill.

Anti-Children protection

same mo, same mo...
I highly suspect that cost cutting is at work...
That in my opinion is cheating... anything which has over 50V & conduct 100mA must be properly barricaded from fingers...
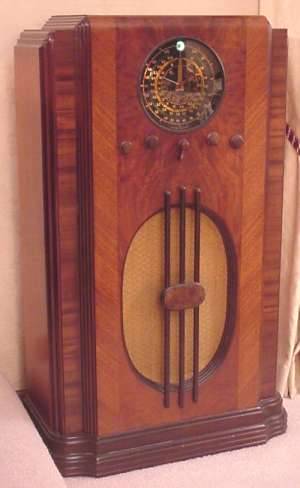
~Ye-Olde .....
In the early days of electronics.


Beautifully crafted cabinet encapsulate all high voltage stuff...
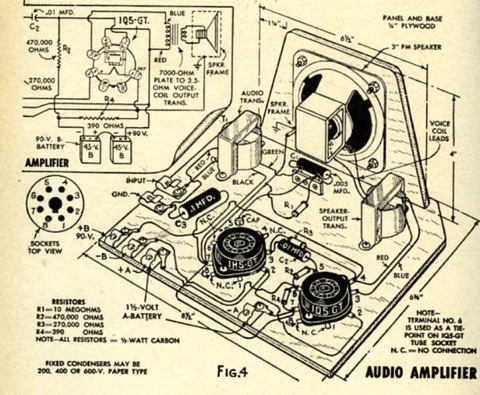
This was how they did it once upon a time.
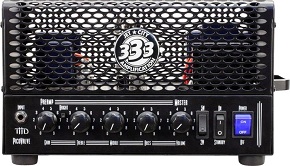
The modern tube guitar amp took up the tradition.....


How I would go about this????
I like these form...

My experience says, stay away from metal works on cosmetic finishing, the cost for the setting up the right gear for high quality consumer grade finishing is not what typical DIY builders would like to put up with.
Wood on the other hand is manageable. The only catch is you gotta commit to generous use of elbow grease for lots of sanding, rubbing & polishing.
Woodpunk Aikido Preamp Cabinet.

This is my preliminary Woodpunk style cabinet.
This cabinet is for 3 chassis. namely, the PSU, PCB & a future DAC chassis.
I tried to keep the valves at least 75mm from any wood. Also, plenty of opening for warm air to escape to prevent localised heating & hence fire in the house.
Instead of using fabric, I will carve as many fretwork possible for ventilation & serve as a art decor... the openings should large enough for unrestricted air flow & small enough to keep itchy fingers at bay. The fretwork should be space strong enough to resist destructive+itchy fingers.
The front panel is finger joint to the bottom.
The back panel does not cover the whole rear end, instead, it leaves a 100mm opening for accessing to the rear end of the chassis. This is good for both fiddling with interconnect & plenty of x-section area for ventilation. The added advantage are added protection to your interconnection cable plug & you can't throw a stone & hit the valves directly :)
3 access opening on the bottem panel for accessing to the chassis separately. This will preserve the structural integrity of the bottom panel and having smaller chassis bottom cover which are easy to handle.
The top, sides, back panel are finger joint together to from a U cover which is detachable. The cover will have sliding grooves on the side panels which can slid into the front penal in the vertical direction.
Choice of wood.... hmmmm... teak is my favorite but they are hard to come by these day, lets keep the selection open for the moment.
Will finish the wood in satin so as to show case the natural wood grain.
IMHO, this has the retro appearance & modern interior...
We have finally come to a solid visual of the finish project.
I'm done for this session....
....Part 6 Preview....
I haven't a clue....
Hi Ken
ReplyDeletethanks for posting
Hope you can post a picture when completed. I can make use of this for a future project.
I find making the chasis / carbinet the most difficult part of the project.
regards
kp93300
You are welcome.
ReplyDeleteWill surely post the pictures once I have them.
Making a chassis/cabinet is not difficult; The challenge lies in making a good looking one....