Many interested parties approached me with their dream to enlist my CNC service to cut/carve their dream project. The encounter will start with a warm welcoming introduction, all the usual chatter, asking what I can do & bla, bla, bla... all were rosy & cheesy until I ask what exactly they want me to cut.... Most describe their requirements verbally with a lot of confident,
here is a typical example,
"It a circle this big (size it up with his hand), with a section that is curved like this (swivel his hand in a wave form in the air), has a contour to fit this very rare fitting (show me a photo of the fitting) that goes in this bit deep (sign with his thumb & index fingers). There carve some flame over here (again waving his hand in the air). How soon can I have it?"
Me : " Do you have a drawing?"
" No."
" A copy of the fitting?"
" No."
" Do you have the dimension of the circle, the curve, the fitting and the depth, type of material?"
" No, I tot you can do circles, curves & accurate depth? and please don't make me mortgage my house..."
".............."
Not wanting to be negative about this but its really not enough info for me to do anything at all...
I mostly end up encouraging them to do their own drawing to save the drawing & design fee that I will eventually charge them.
As I require vector graphics, it is natural that I narrow my learning towards that...
AutoCad is my personal preference, and INKSCAPE is free...
IMHO, This is the only place you need to be to learn up everthing there is to know about AutoCAD for free.
If Autocad is too expensive or too intimidating, you can use a vector graphic editing package call InkScape, its Open Source A.K.A Free. Free download here
Some good tutorials & instructions Here
Many videos in YouTube on InkScape
This gives an excellent introduction to InkScape
This has all the tutorials that you may need to become a pro.
Hope this helps.
Tuesday, May 25, 2010


Monday, May 24, 2010
How Boring is Drawing

You can not get too bored with drawing...
Just visualise this, when we scribble on a piece of paper, the years of foundation training of flying the crayon on the wall during our childhood days kicks in subconsciously & we are free to draw any lines on the piece of paper & hopefully these lines will mean something to anyone other than ourselves...
When we wish to draw stright lines & constructing meaningful shapes on a piece of paper, the hands will grab a ruler or a protractor & our secondary training during primary & secondary school takes over & there we have nice orderly lines on a piece of paper which actually mean something to most people...
For those who took up some form of institutional engineering training or education will learn to draw & read engineering drawings properly & again subconsciously pack in the necessary information onto the piece of papers with lines which we call engineering drawings...
In my early stage of drawing with CAD, life was really frustrating... A simple task of drawing a straight line can turn into disaster... it really happened! I deleted an entire file because I click on something accidently.... dividing a line into a few equal section can take more than half an hour until I learnt that there is a command that I can use to do so with a few clicks on the mouse & all can be accomplished within a second... to draw a line on tangent of 2 circles turn into a full-blown construction drawings taking nearly an hours when a simple typing tan on the keyboard then right-click the circle can do the job...
Once you get more "fluent" conversing in the correct "language", things can get really interesting & fun filling... eg, we can use "offset" command to construct lines & check size of your design on drawing, make complex contours using "polylines" & play with its sub-commands such as L (for Line) & A ( for arc) on the keyboard, then drag the line to accommodate your desired shapes... copying object is a god sent when identical object are needed; Rotating parts in the drawing takes a bit of practice but they are extremely precise; Moving object to desired location/position is a breeze; Resize the drawing can save hundreds of hours of drawing; drawing chamber & fillers are just 2 clicks away;
Best of all, you can redo the drawing till the cow comes home & nothing is loss... I still recall the amount of eraser scrap covered desk after a drawing session during my school days... not forgetting drawings with holes made by excessive erasing with a laser knife on PP paper...
Wednesday, May 19, 2010
Pre-raquisite Software Skill for operating the BEAST
Building the CNC Router was a stressful but fulfilling experience. Inflated ego was the direct product of this memorable journey. BUT that is only the starting line of my CNC endeavour. Now that I have a machine at my disposal, I need to learn up how to drive this machine to churn out those beautiful artifact like we seen in the net.
In retrospect, running the machine is easy, but that is only after you actually operate the machine...
I totally over estimated my learning capacity, & underestimated the complexity of the software involvement in running a CNC machine. After over a month of tinkering with running the machine & many software packages, I come to this overly generalised summery.
You need a Drawing to convert to G-code, feed the G-code to the Motion Controller. To cut properly, one need to know the cutting tool characteristics, material properties & some machining procedure knowledge.
Drawings
To make something with or without CNC machines, we need to provide specific specifications of what to do, so coming up with a drawing is the first step.
From my understanding, we can use 2 types of drawing files, namely Raster & Vector.
In raster, examples are bitmap such as jpg, png etc. With this, the cutter will transverse the whole area covered by the file, this is how most 3D cutting is done. With Vector file, the cutter only travels along the path where the cutting is required, saving lots of time. this is how profile cutting & 2.5D are done.
Drawing software
With different cutting strategies different software are used. In vector files, we direct the cutter in straight lines to cut the profile or contours, leaving the other space alone. In raster file, the cutter will transverse every mm of the file... example of raster files are bitmap. & the generally accepted vector file format is .DXF, other formats are SVG, AI, STL... etc etc
I'm fortunate enough to have worked with AutoCad in my junior career life & residue memory helps a lot when relearning. This is my preference for 2D & 3D rendering but there are others such as SolidWorks. You can also use CoralDraw, Win Paint, Adobe Inventor, SketchUp Pro,.... Open source CAD drawing are not quite up to the fee software but I find Blender is a promising, still crude but its getting somewhere.
I also learn that one doesn't need to draw a drawing from scratch everytime, especially when we are dealing with ornamental & art craft... We can "convert" raster files to vector files by tracing bitmap. I downloaded the open source INKSCAPE software which can do many capabilities of fee software such as the Coraldraw & Adobe AI.
G-code
One can write G-code from scratch if they feel they are up to it, BUT I'm too lazy for that... CAMBAM, UCANCAM, SHEETCAM, LAZYCAM... a whole library of CAM software which can translate vector file into G-code. I evenetually ended up with VCarve Pro for 2D & 2.5D works & Cut3D for 3D works..
At the end of the day, depending on requirement, all common or not so common software packages works, the difference are in the learning curve & the ingenuity of the user to utilise the available capabilities of each. Its a compromise of $, time & requirement.
In retrospect, running the machine is easy, but that is only after you actually operate the machine...
I totally over estimated my learning capacity, & underestimated the complexity of the software involvement in running a CNC machine. After over a month of tinkering with running the machine & many software packages, I come to this overly generalised summery.
You need a Drawing to convert to G-code, feed the G-code to the Motion Controller. To cut properly, one need to know the cutting tool characteristics, material properties & some machining procedure knowledge.
Drawings
To make something with or without CNC machines, we need to provide specific specifications of what to do, so coming up with a drawing is the first step.
From my understanding, we can use 2 types of drawing files, namely Raster & Vector.
In raster, examples are bitmap such as jpg, png etc. With this, the cutter will transverse the whole area covered by the file, this is how most 3D cutting is done. With Vector file, the cutter only travels along the path where the cutting is required, saving lots of time. this is how profile cutting & 2.5D are done.
Drawing software
With different cutting strategies different software are used. In vector files, we direct the cutter in straight lines to cut the profile or contours, leaving the other space alone. In raster file, the cutter will transverse every mm of the file... example of raster files are bitmap. & the generally accepted vector file format is .DXF, other formats are SVG, AI, STL... etc etc
I'm fortunate enough to have worked with AutoCad in my junior career life & residue memory helps a lot when relearning. This is my preference for 2D & 3D rendering but there are others such as SolidWorks. You can also use CoralDraw, Win Paint, Adobe Inventor, SketchUp Pro,.... Open source CAD drawing are not quite up to the fee software but I find Blender is a promising, still crude but its getting somewhere.
I also learn that one doesn't need to draw a drawing from scratch everytime, especially when we are dealing with ornamental & art craft... We can "convert" raster files to vector files by tracing bitmap. I downloaded the open source INKSCAPE software which can do many capabilities of fee software such as the Coraldraw & Adobe AI.
G-code
One can write G-code from scratch if they feel they are up to it, BUT I'm too lazy for that... CAMBAM, UCANCAM, SHEETCAM, LAZYCAM... a whole library of CAM software which can translate vector file into G-code. I evenetually ended up with VCarve Pro for 2D & 2.5D works & Cut3D for 3D works..
At the end of the day, depending on requirement, all common or not so common software packages works, the difference are in the learning curve & the ingenuity of the user to utilise the available capabilities of each. Its a compromise of $, time & requirement.
Saturday, April 3, 2010
ITS ALIVE!!!!!!
Virgin cut were commenced on 5:30pm 31st March 2010....
There outcome.......... Speechless....
I'll just let the pix talk...


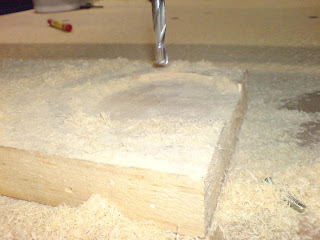
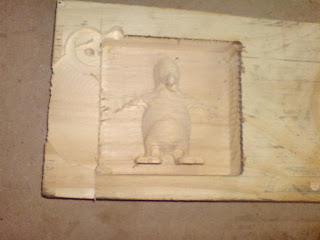
The 1st complete relief carving....
Will frame this as it is for me to show my grand children...
Now that I'd build the "car" I'll have to learn to drive.
There outcome.......... Speechless....
I'll just let the pix talk...


The 1st complete relief carving....
Will frame this as it is for me to show my grand children...
Now that I'd build the "car" I'll have to learn to drive.
Sunday, March 28, 2010
When is The Virgin Cut
In the beginning, I gave myself an ultimatum to make some wood dust by March 2010, & its only 3 days way...
Without further ado, here is the status.
 Installed the cable chain & layout most of the cables


 A closer look at the Gantry
 The spindle took position.

Spoil-board in place. now it really looks like a mean machine!
Well, getting closer now, hmm.... still need to commission the spindle, build the water cooling system for the spindle, mount the control panel, do the final cable connection, do the Emergency -Stop installation, install the gas spring, mount the Variable Speed Drive, ... and...... that's it... I guess....
My brother had booked the front seat & my neighbors are all enthusiastic to see the blue beast in action, time & money running low, potential customers & business partners asking for samples...... etc etc
...........lets see if I can make the virgin cut happen on 7.pm, Wednesday, 31st March 2010.
Anyone interested to witness this historical moment (at least it is to me ;) ) are most welcome, bring your own drinks if you wish. I would appreciate a bottle of champagne or 2 for the occasion.
Thats all for now, gotta work on double shift to make this happen...
Wish me luck!
Without further ado, here is the status.


Spoil-board in place. now it really looks like a mean machine!
Well, getting closer now, hmm.... still need to commission the spindle, build the water cooling system for the spindle, mount the control panel, do the final cable connection, do the Emergency -Stop installation, install the gas spring, mount the Variable Speed Drive, ... and...... that's it... I guess....
My brother had booked the front seat & my neighbors are all enthusiastic to see the blue beast in action, time & money running low, potential customers & business partners asking for samples...... etc etc
...........lets see if I can make the virgin cut happen on 7.pm, Wednesday, 31st March 2010.
Anyone interested to witness this historical moment (at least it is to me ;) ) are most welcome, bring your own drinks if you wish. I would appreciate a bottle of champagne or 2 for the occasion.
Thats all for now, gotta work on double shift to make this happen...
Wish me luck!
Friday, March 19, 2010
Z-Axis Concoction

I did my own "design" to cure my needs to have my own signature in this machine.
Using Linear Slide & Rail bar is more expensive, but it does give peace to my mind & fulfill my over-sized ego...


All Axis are assemble (almost)...
The last piece of purchase to get this to machine to work will be the Gas Spring & a 500mm long gear rack.
Tuesday, March 16, 2010
Control Panel Revisit
Took some time out from the Mechanical work to work on the Electrical & Electronics Department.
 Bought a economical PC chassis to house the Atom board, its really convenient & took less then 30 minutes to get it done. Should had gone this way from day one, real salvation of my sanity.
 Re-mounted the BOB with a ribbon cable to the external connector.
 Changed the internal hook-up wire to 18AWG wires. I learn the hard way that thin 24AWG wires keeps breaking under its own weight & my itchy fingers didn't help.
 Re-position the contractor, Rectifier & capacitor.
Opened a few holes for the cooling fan, main feeder wires, screen stepper cables... etc

 Re-mounted the BOB with a ribbon cable to the external connector.

Opened a few holes for the cooling fan, main feeder wires, screen stepper cables... etc
Subscribe to:
Posts (Atom)